A new edition of The Coastal Passage has just been posted. Click on the image at right to download the PDF. Covid Cruising! From Tasmania to Greece with a boat built by the editor. For more information on this boat, see www.buildacat.com and check out The BareBones project.

 Home Page

 Technical Articles

 Working Aloft

 Weatherhelm, What and How??

 Rig Maintenance Made Simple
 

 Click here for your FREE download of the latest edition of The Coastal Passage

 RIGGING MADE SIMPLE 

Also see "Working Aloft", "Rig Maintenance Made Simple" and "Weather Helm", what and how!

By Petrea Heathwood, SY "Talisman"

How do I adjust my rigging? How tight should it be? How will I know if I've got it right?

In this article I'll try to answer some of the most common questions about rigging. It's meant as a simple, practical guide, without going in to the theory of it.

This is a basic way of getting your mast(s) standing the way it should, with correct tension on the rigging. It's for the average Bermudan rigged cruising yacht. Gaff and other different rigs will differ in the details but the idea is the same for most rigs. Like everything in sailing there are other ways, but this is how it's been done for many new and used cruising boats.

Just do it!
The first thing is not to be afraid of making adjustments. If you ever adjusted the spokes on your bicycle wheel you'll find the principle is much the same.

Before you loosen any rigging, mark its tension with a piece of tape or a cable tie on the thread above the turnbuckle. That way if you stuff up you can at least return to this setting.

The steps to adjusting rigging are-
1. Get the mast(s) standing upright in the boat
2. Get it straight.
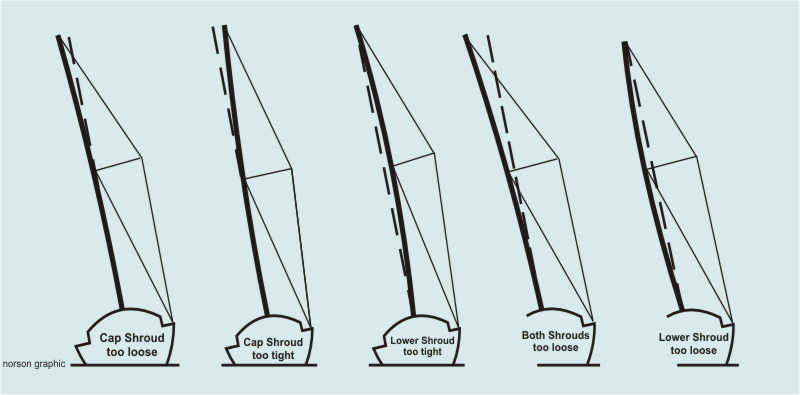
The second is the tricky one. It may look straight at anchor but you'll need to sight up the sail track while sailing to make sure. So it's really a multi-step process of adjustment/sailing/adjustment.


STEP 1 - Get it standing upright in the boat
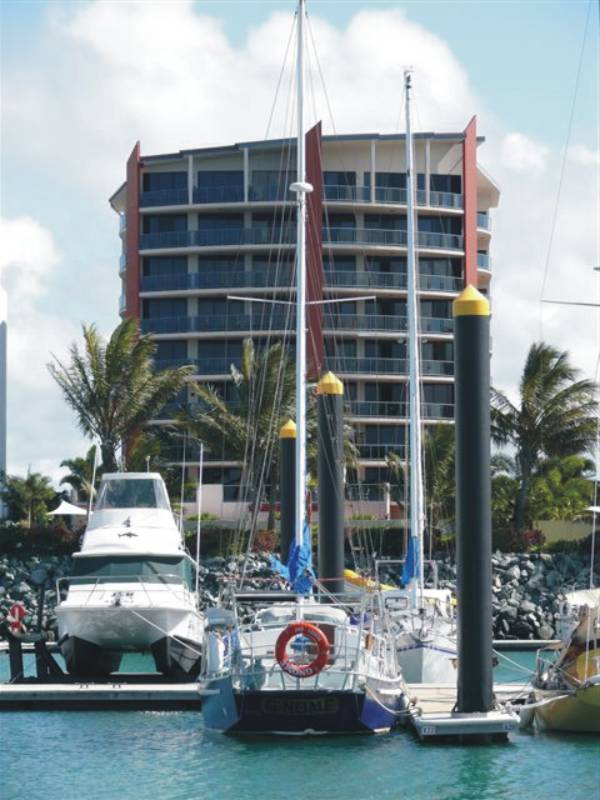
Sounds obvious but you'd be surprised how many masts lean to one side. Don't worry about measuring from the masthead to the gunwale or any other clever measurement methods. Few boats are symmetrical.

Not just the home made ones - before Talisman I lived on an up-market production boat. The centerline of her deck was an inch or more from the centerline of the hull. Her mast step also tilted to one side. We discovered this when we couldn't get the mast to stand straight and corrected it but there are fifteen sisterships probably still sailing around with crooked masts.

Please bear in mind I'm not saying NOT to do this more scientifically, only that you don't need to.


 Get the boat level.
Make sure no one is walking around on board while you're doing this and do it in the calm of morning.

Go round the boat and check it is sitting level from side to side and fore and aft. Don't even look at the mast at this stage, just the boat. Actually block the mast from view with your hand.

When you reckon she's level have a look at the mast. You can do this by eye, or by lining up with marina piles or buildings ashore - anything handy that should be straight. In a marina it can be hard to get far enough away for a proper look, you need a clear view from at least a boat length away.

Otherwise use a plumb bob suspended from the mast head. I caution against using a spirit level as you need to be on board for this and your weight will affect the reading (yes, even on a multi)

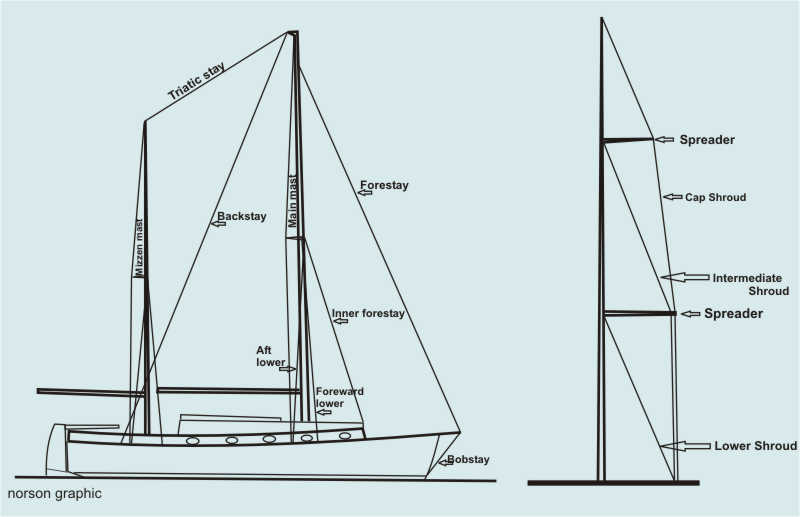
Where there is more than one do the main mast first. If it's upright you can proceed to Step 2.

If not, loosen all the side rigging except the cap shrouds. Make sure there is nothing else influencing the lean of the mast (main boom hanging to one side, wind etc.).

Caution! Keep the threaded part of the turnbuckles well within the barrel, at least as far as the diameter of the thread. Never undo a piece of rigging completely unless you are absolutely certain something else is supporting the mast in its place.

Adjust the cap shrouds until it stands upright side to side. When it's right you could do the other mast(s) but it's probably better to finish the main mast so there's not too much loose rigging flopping around making you nervous. To get another mast lined up with the main one, sight both sides of it - just checking one side gives a false impression

Fore & aft
Check the rake of the mast from the side. Loosen the fore and aft rigging and adjust until you're happy with the way it looks. Unless you have a junk rig it should not lean forward. Straight up and down is OK but won't look good. A few inches of rake generally looks better.

If your boat has weather helm keep the mast almost vertical. If weather helm is not a problem a bit more mast rake will look better. If you have lee helm (pretty unusual) raking the mast aft will help.

When adjusting the rake of the smaller mast don't bother trying to measure the rake on the main mast. It is possible to exactly duplicate the rake of a mast but a mizzen generally needs to lean back further than the main in order to appear parallel.

 STEP 2 - Get it straight
Now the mast is standing in about the right place you need to make sure it is straight athwartships. Sight up the mainsail track or slot. If the track is riveted or screwed on, don't assume it is straight. It may be but some are not.

This step is simple on a small boat. In a larger boat you will have to get your eye up above the stack of the mainsail so you can see up the track. Climb up and sit on top of the sail if you have to. It's better not to use a bosun's chair to get up there as your weight could influence the bend of the mast. Depending on the boat it may be easier to remove the mainsail slides from the mast to allow you to sight up the track.

This is much easier to see when you're sailing. If you're confident the mast is upright and raked correctly you can do the adjustments underway without loosening off the rigging first.

Sight up the mast on one tack; decide what to adjust, tack and adjust the now-leeward rigging, then tack again to see how it looks. If you have a willing crew, go for it. Just be careful not to over tension the lee rigging - all too easy to do, then the boat and mast will be under too much strain. Otherwise do it at the dock then fine tune after you've been sailing again.

You're looking to see that the mast is completely straight from side to side. Check for bowing between the deck and spreaders, spreaders and masthead, and between the spreaders if you have more than one set. [See diagram]

Check the angle of the spreaders
The spreader tips should be attached to the shroud which passes over them, usually by means of a clamp or wire seizing. Whatever the method, the angle between the spreader and shroud should be the same above and below the spreader. Even if this is not quite equal it is important that the spreader arm does not droop below horizontal, or have a bend. To get this right, release the clamp and tap the spreader to the correct angle. The spreader sockets on the mast will give an indication of the angle the spreaders are meant to sit at. Have a look at it away from the boat to judge when it is right.

 How much tension?
Wire stretches under load so the longer wires need to be proportionally tighter than the shorter ones. Unless it is an old wooden boat aim to have the rigging fairly tight. The test is when sailing, lee shrouds should only be slightly slack, not swinging around. If leeward shrouds are still tight when sailing to windward in 12-15 knots, the rigging is causing unnecessary compression on the mast.

An older wooden boat should have the rigging a bit slacker so the hull isn't stressed at rest.

Fore and aft
The rake of the mast is controlled by the forestay. You have already adjusted this. Tension the forestay only enough to allow for stretch. The forestay needs to be kept tight for sailing to windward and this is controlled by backstay(s) tension. It needs to be really firm to achieve this.

The mast can be straight fore and aft or it can have a gentle curve forward in the centre. This is not especially desirable but if your mainsail is a bit tired or full (and most are) the slight bend can help to flatten it. I'm talking about a bend of about one mast width, no more than that.

Adjust the fore and aft bend with the lower shrouds and inner forestay, bearing in mind that the lowers also affect the sideways bend. The aft lowers compensate for any bend caused by the forward ones or the inner forestay.

Go Sailing
Once you have made these adjustments with the boat at rest it's time to have a look at it under sail. Sight up the track as described above. Check whether the mast is standing straight athwartships. See if it is straight fore and aft or has a slight bend forward in the middle. Make further adjustments as necessary until you're happy with the way it looks.

Lock it up
When you're finished messing with the rigging be sure to re-tighten all locking nuts or re-fasten the locking wire on EVERY rigging screw
.

   The following photo shows an example of sighting with objects ..

 photo by Petrea Heathwood

 #1 Terminology:
Rake:
The lean of the mast in the fore and aft plane.

Weather helm: A strong tendency to turn into the wind. Light weather helm is healthy, if you let go of the helm the boat will luff up into the wind and stop. Heavy weather helm will slow the boat and make it hard to sail.

Lee helm: A tendency to turn away from the wind. Dangerous if it exists in moderate to strong winds but very common and no problem if it only happens in very light air.

#2 What if you can't get it straight?
The mast step on some boats is not level. If you can't get the mast to stand straight, check the step. Sometimes this problem can be corrected by fitting wedges under the mast base.

Alternatively if the step is not far out, simply let the mast stand square to the step, leaning slightly to one side. It won't look obvious, and you should be able to adjust the rigging to keep it straight. The boat will sail to windward slightly differently on each tack. It's actually a common problem and you might be surprised at the number of boats sailing like this, even fairly high performance cruiser/racers.

#3 Keel-stepped masts
For a keel stepped mast the wedges or chocks at deck level should be removed for this exercise.
When the rigging has been adjusted satisfactorily the wedges are replaced. They should hold the mast section firmly against the inner edge of the hole without pushing it in any direction. As with the mast step, don't assume this hole is correctly centred.

In practice most of us are reluctant to disturb the boot around the mast at deck level because of waterproofing issues. With a good set-up it should be possible to adjust the wedges from underneath but unfortunately they're not all like that. It really is a waste of time to try adjusting rigging with the wedges in place.

By following this article carefully a sailor may decrease their dependence on shore services and increase the satisfaction of boat ownership.

One day you may need to troubleshoot a sailing problem in a location where a rigger is not available. If you aren't confident of the outcome return the rigging to its existing settings and have the rig adjusted by a professional.

The advice contained herein is meant in a general sense only. It does not and cannot apply in a specific sense to any particular boat. Like everything to do with the sea, a prudent and cautious sailor will make use of this information to the extent they feel comfortable.

PETREA HEATHWOOD

 About the author (Just so people know who is telling them all this stuff) -
I've been sailing since 1967. Racing and cruising. In the mid 1970's I worked for a Brisbane yacht rigging and boat sales company. In 1979 I went to Sydney to work for a marine importing company and sail ocean racers on the Sydney circuit and beyond. In the early 80's I returned to Queensland and worked for Almasts, the oldest yacht rigging business in Queensland. I left to start my own rigging business, which I operated until I decided to go cruising full time.

Photo By Bob Norson